If you need to detect gestures in your app, such as taps, pinches,
pans, or rotations, it’s extremely easy with the built-in
UIGestureRecognizer classes.
In this tutorial, we’ll show you how you can easily add gesture
recognizers into your app, both within the Storyboard editor in iOS 5,
and programatically.
We’ll create a simple app where you can move a monkey and a banana
around by dragging, pinching, and rotating with the help of gesture
recognizers.
We’ll also demonstrate some cool extras like:
- Adding deceleration for movement
- Setting gesture recognizers dependency
- Creating a custom UIGestureRecognizer so you can tickle the monkey! :]
This tutorial assumes you are familiar with the basic concepts of ARC
and Storyboards in iOS 5. If you are new to these concepts, you may
wish to check out our
ARC and
Storyboard tutorials first.
I think the monkey just gave us the thumbs up gesture, so let’s get started! :]
Getting Started
Open up Xcode and create a new project with the
iOS\Application\Single View Application template. For the Product Name
enter MonkeyPinch, for the Device Family choose iPhone, and select the
Use Storyboard and Use Automatic Reference Counting checkboxes, as shown
below.
First, download the
resources for this project
and add the four files inside into your project. In case you’re
wondering, the images for this tutorial came from my lovely wife’s
free game art pack, and we made the sound effects ourselves with a mike :P
Next, open up MainStoryboard.storyboard, and drag an Image View into
the View Controller. Set the image to monkey_1.png, and resize the
Image View to match the size of the image itself by selecting
Editor\Size to Fit Content. Then drag a second image view in, set it to
object_bananabunch.png, and also resize it. Arrange the image views
however you like in the view controller. At this point you should have
something like this:

That’s it for the UI for this app – now let’s add a gesture recognizer so we can drag those image views around!
UIGestureRecognizer Overview
Before we get started, let me give you a brief overview of how you use UIGestureRecognizers and why they’re so handy.
In the old days before UIGestureRecognizers, if you wanted to detect a
gesture such as a swipe, you’d have to register for notifications on
every touch within a UIView – such as touchesBegan, touchesMoves, and
touchesEnded. Each programmer wrote slightly different code to detect
touches, resulting in subtle bugs and inconsistencies across apps.
In iOS 3.0, Apple came to the rescue with the new UIGestureRecognizer
classes! These provide a default implementation of detecting common
gestures such as taps, pinches, rotations, swipes, pans, and long
presses. By using them, not only does it save you a ton of code, but it
makes your apps work properly too!
Using UIGestureRecognizers is extremely simple. You just perform the following steps:
- Create a gesture recognizer. When you create a gesture
recognizer, you specify a callback method so the gesture recognizer can
send you updates when the gesture starts, changes, or ends.
- Add the gesture recognizer to a view. Each gesture
recognizer is associated with one (and only one) view. When a touch
occurs within the bounds of that view, the gesture recognizer will look
to see if it matches the type of touch it’s looking for, and if a match
is found it will notify the callback method.
You can perform these two steps programatically (which we’ll do later
on in this tutorial), but it’s even easier adding a gesture recognizer
visually with the Storyboard editor. So let’s see how it works and add
our first gesture recognizer into this project!
UIPanGestureRecognizer
Still with MainStoryboard.storyboard open, look inside the Object
Library for the Pan Gesture Recognizer, and drag it on top of the monkey
Image View. This both creates the pan gesture recognizer, and it with
the monkey Image View. You can verify you got it connected OK by
clicking on the monkey Image View, looking at the Connections Inspector,
and making sure the Pan Gesture Recognizer is in the gestureRecognizers
collection:

You may wonder why we associated it to the image view instead of the
view itself. Either approach would be OK, it’s just what makes most
sense for your project. Since we tied it to the monkey, we know that
any touches are within the bounds of the monkey so we’re good to go.
The drawback of this method is sometimes you might want touches to be
able to extend beyond the bounds. In that case, you could add the
gesture recognizer to the view itself, but you’d have to write code to
check if the user is touching within the bounds of the monkey or the
banana and react accordingly.
Now that we’ve created the pan gesture recognizer and associated it
to the image view, we just have to write our callback method so we can
actually do something when the pan occurs.
Open up ViewController.h and add the following declaration:
- (IBAction)handlePan:(UIPanGestureRecognizer *)recognizer;
|
Then implement it in ViewController.m as follows:
- (IBAction)handlePan:(UIPanGestureRecognizer *)recognizer {

    CGPoint translation = [recognizer translationInView:self.view];
    recognizer.view.center = CGPointMake(recognizer.view.center.x + translation.x,
                                         recognizer.view.center.y + translation.y);
    [recognizer setTranslation:CGPointMake(0, 0) inView:self.view];

}
|
The UIPanGestureRecognizer will call this method when a pan gesture
is first detected, and then continuously as the user continues to pan,
and one last time when the pan is complete (usually the user lifting
their finger).
The UIPanGestureRecognizer passes itself as an argument to this
method. You can retrieve the amount the user has moved their finger by
calling the translationInView method. Here we use that amount to move
the center of the monkey the same amount the finger has been dragged.
Note it’s extremely important to set the translation back to zero
once you are done. Otherwise, the translation will keep compounding
each time, and you’ll see your monkey rapidly move off the screen!
Note that instead of hard-coding the monkey image view into this
method, we get a reference to the monkey image view by calling
recognizer.view. This makes our code more generic, so that we can
re-use this same routine for the banana image view later on.
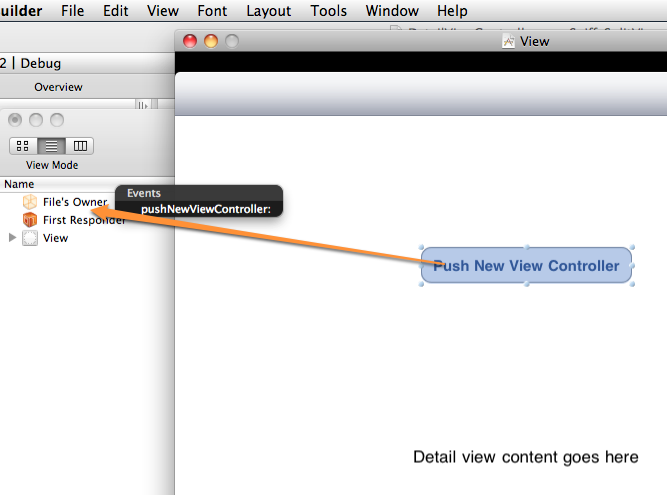
OK, now that this method is complete let’s hook it up to the
UIPanGestureRecognizer. Select the UIPanGestureRecongizer in Interface
Builder, bring up the Connections inspector, and drag a line from the
selector to the View Controller. A popup will appear – select
handlePan. At this point your Connections Inspector for the Pan Gesture
Recognizer should look like this:

Compile and run, and try to drag the monkey and… wait, it doesn’t work!
The reason this doesn’t work is that touches are disabled by default
on views that normally don’t accept touches, like Image Views. So
select both image views, open up the Attributes Inspector, and check the
User Interaction Enabled checkbox.

Compile and run again, and this time you should be able to drag the monkey around the screen!

Note that you can’t drag the banana. This is because gesture
recognizers should be tied to one (and only one) view. So go ahead and
add another gesture recognizer for the banana, by performing the
following steps:
- Drag a Pan Gesture Recognizer on top of the banana Image View.
- Select the new Pan Gesture Recognizer, select the Connections
Inspector, and drag a line from the selector to the View Controller and
connect it to the handlePan method.
Give it a try and you should now be able to drag both image views
across the screen. Pretty easy to implement such a cool and fun effect,
eh?
Gratuitous Deceleration
In a lot of Apple apps and controls, when you stop moving something
there’s a bit of deceleration as it finishes moving. Think about
scrolling a web view, for example. It’s common to want to have this
type of behavior in your apps.
There are many ways of doing this, but we’re going to do one very
simple implementation for a rough but nice effect. The idea is we need
to detect when the gesture ends, figure out how fast the touch was
moving, and animate the object moving to a final destination based on
the touch speed.
- To detect when the gesture ends: The callback we pass to
the gesture recognizer is called potentially multiple times – when the
gesture recognizer changes its state to begin, changed, or ended for
example. We can find out what state the gesture recognizer is in simply
by looking at its state property.
- To detect the touch velocity: Some gesture recognizers
return additional information – you can look at the API guide to see
what you can get. There’s a handy method called velocityInView that we
can use in the UIPanGestureRecognizer!
So add the following to the bottom of the handlePan method:
if (recognizer.state == UIGestureRecognizerStateEnded) {

    CGPoint velocity = [recognizer velocityInView:self.view];
    CGFloat magnitude = sqrtf((velocity.x * velocity.x) + (velocity.y * velocity.y));
    CGFloat slideMult = magnitude / 200;
    NSLog(@"magnitude: %f, slideMult: %f", magnitude, slideMult);

    float slideFactor = 0.1 * slideMult; // Increase for more of a slide
    CGPoint finalPoint = CGPointMake(recognizer.view.center.x + (velocity.x * slideFactor),
                                     recognizer.view.center.y + (velocity.y * slideFactor));
    finalPoint.x = MIN(MAX(finalPoint.x, 0), self.view.bounds.size.width);
    finalPoint.y = MIN(MAX(finalPoint.y, 0), self.view.bounds.size.height);

    [UIView animateWithDuration:slideFactor*2 delay:0 options:UIViewAnimationOptionCurveEaseOut animations:^{
        recognizer.view.center = finalPoint;
    } completion:nil];

}
|
This is just a very simple method I wrote up for this tutorial to simulate deceleration. It takes the following strategy:
- Figure out the length of the velocity vector (i.e. the magnitude)
- If the length is < 200, then decrease the base speed, otherwise increase it.
- Calculate a final point based on the velocity and the slideFactor.
- Make sure the final point is within the view’s bounds
- Animate the view to the final resting place.
- It uses the “ease out” animation option to slow down the movement over time.
Compile and run to try it out, you should now have some basic but
nice deceleration! Feel free to play around with it and improve it – if
you come up with a better implementation, please share in the forum
discussion at the end of this article.
UIPinchGestureRecognizer and UIRotationGestureRecognizer
Our app is coming along great so far, but it would be even cooler if
you could scale and rotate the image views by using pinch and rotation
gestures as well!
Let’s add the code for the callbacks first. Add the following declarations to ViewController.h:
- (IBAction)handlePinch:(UIPinchGestureRecognizer *)recognizer;
- (IBAction)handleRotate:(UIRotationGestureRecognizer *)recognizer;
|
And add the following implementations in ViewController.m:
- (IBAction)handlePinch:(UIPinchGestureRecognizer *)recognizer {
    recognizer.view.transform = CGAffineTransformScale(recognizer.view.transform, recognizer.scale, recognizer.scale);
    recognizer.scale = 1;
}

- (IBAction)handleRotate:(UIRotationGestureRecognizer *)recognizer {
    recognizer.view.transform = CGAffineTransformRotate(recognizer.view.transform, recognizer.rotation);
    recognizer.rotation = 0;
}
|
Just like we could get the translation from the pan gesture
recotnizer, we can get the scale and rotation from the
UIPinchGestureRecognizer and UIRotationGestureRecognizer.
Every view has a transform that is applied to it, which you can think
of as information on the rotation, scale, and translation that should
be applied to the view. Apple has a lot of built in methods to make
working with a transform easy such as CGAffineTransformScale (to scale a
given transform) and CGAffineTransformRotate (to rotate a given
transform). Here we just use these to update the view’s transform based
on the gesture.
Again, since we’re updating the view each time the gesture updates,
it’s very important to reset the scale and rotation back to the default
state so we don’t have craziness going on.
Now let’s hook these up in the Storyboard editor. Open up MainStoryboard.storyboard and perform the following steps:
- Drag a Pinch Gesture Recognizer and a Rotation Gesture Recognizer on top of the monkey. Then repeat this for the banana.
- Connect the selector for the Pinch Geture Recognizers to the View
Controller’s handlePinch method. Connect the selector for the Rotation
gesture recognizers to the View Controller’s handleRotate method.
Compile and run (I recommend running on a device if possible because
pinches and rotations are kinda hard to do on the simulator), and now
you should be able to scale and rotate the monkey and banana!

Simultaneous Gesture Recognizers
You may notice that if you put one finger on the monkey, and one on
the banana, you can drag them around at the same time. Kinda cool, eh?
However, you’ll notice that if you try to drag the monkey around, and
in the middle of dragging bring down a second finger to attempt to
pinch to zoom, it doesn’t work. By default, once one gesture recognizer
on a view “claims” the gesture, no others can recognize a gesture from
that point on.
However, you can change this by overriding a method in the UIGestureRecognizer delegate. Let’s see how it works!
Open up ViewController.h and mark the class as implementing UIGestureRecognizerDelegate as shown below:
@interface ViewController : UIViewController <UIGestureRecognizerDelegate>
|
Then switch to ViewController.m and implement one of the optional methods you can override:
- (BOOL)gestureRecognizer:(UIGestureRecognizer *)gestureRecognizer shouldRecognizeSimultaneouslyWithGestureRecognizer:(UIGestureRecognizer *)otherGestureRecognizer {
    return YES;
}
|
This method tells the gesture recognizer whether it is OK to
recognize a gesture if another (given) recognizer has already detected a
gesture. The default implementation always returns NO – we switch it
to always return YES here.
Next, open MainStoryboard.storyboard, and for each gesture recognizer connect its delegate outlet to the view controller.
Compile and run the app again, and now you should be able to drag the
monkey, pinch to scale it, and continue dragging afterwards! You can
even scale and rotate at the same time in a natural way. This makes for
a much nicer experience for the user.
Programmatic UIGestureRecognizers
So far we’ve created gesture recognizers with the Storyboard editor, but what if you wanted to do things programatically?
It’s just as easy, so let’s try it out by adding a tap gesture
recognizer to play a sound effect when either of these image views are
tapped.
Since we’re going to play a sound effect, we need to add the
AVFoundation.framework to our project. To do this, select your project
in the Project navigator, select the MonkeyPinch target, select the
Build Phases tab, expand the Link Binary with Libraries section, click
the Plus button, and select AVFoundation.framework. At this point your
list of frameworks should look like this:

Open up ViewController.h and make the following changes:
// Add to top of file
#import <AVFoundation/AVFoundation.h>

// Add after @interface
@property (strong) AVAudioPlayer * chompPlayer;
- (void)handleTap:(UITapGestureRecognizer *)recognizer;
|
And then make the following changes to ViewController.m:
// After @implementation
@synthesize chompPlayer;

// Before viewDidLoad
- (AVAudioPlayer *)loadWav:(NSString *)filename {
    NSURL * url = [[NSBundle mainBundle] URLForResource:filename withExtension:@"wav"];
    NSError * error;
    AVAudioPlayer * player = [[AVAudioPlayer alloc] initWithContentsOfURL:url error:&error];
    if (!player) {
        NSLog(@"Error loading %@: %@", url, error.localizedDescription);
    } else {
        [player prepareToPlay];
    }
    return player;
}

// Replace viewDidLoad with the following
- (void)viewDidLoad
{
    [super viewDidLoad];
    for (UIView * view in self.view.subviews) {

        UITapGestureRecognizer * recognizer = [[UITapGestureRecognizer alloc] initWithTarget:self action:@selector(handleTap:)];
        recognizer.delegate = self;
        [view addGestureRecognizer:recognizer];

        // TODO: Add a custom gesture recognizer too

    }

    self.chompPlayer = [self loadWav:@"chomp"];
}

// Add to bottom of file
- (void)handleTap:(UITapGestureRecognizer *)recognizer {
    [self.chompPlayer play];
}
|
The audio playing code is outside of the scope of this tutorial so we won’t discuss it (although it is incredibly simple).
The imiportant part is in viewDidLoad. We cycle through all of the
subviews (just the monkey and banana image views) and create a
UITapGestureRecognizer for each, specifying the callback. We set the
delegate of the recognizer programatically, and add the recognizer to
the view.
That’s it! Compile and run, and now you should be able to tap the image views for a sound effect!
UIGestureRecognizer Dependencies
It works pretty well, except there’s one minor annoyance. If you
drag an object a very slight amount, it will pan it and play the sound
effect. But what we really want is to only play the sound effect if no
pan occurs.
To solve this we could remove or modify the delegate callback to
behave differently in the case a touch and pinch coincide, but I wanted
to use this case to demonstrate another useful thing you can do with
gesture recognizers: setting dependencies.
There’s a method called requireGestureRecognizerToFail that you can
call on a gesture recognizer. Can you guess what it does? ;]
Let’s try it out. Open MainStoryboard.storyboard, open up the
Assistant Editor, and makes ure that ViewController.h is showing there.
Then control-drag from the monkey pan gesture recognizer to below the
@interface, and connect it to an outlet named monkeyPan. Repeat this
for the banana pan gesture recognizer, but name the outlet bananaPan.
Then simply add these two lines to viewDidLoad, right before the TODO:
[recognizer requireGestureRecognizerToFail:monkeyPan];
[recognizer requireGestureRecognizerToFail:bananaPan];
|
Now the tap gesture recognizer will only get called if no pan is
detected. Pretty cool eh? You might find this technique useful in some
of your projects.
Custom UIGestureRecognizer
At this point you know pretty much everything you need to know to use
the built-in gesture recognizers in your apps. But what if you want to
detect some kind of gesture not supported by the bulit-in recognizers?
Well, you could always write your own! Let’s try it out by writing a
very simple gesture recognizer to detect if you try to “tickle” the
monkey or banana by moving your finger several times from left to right.
Create a new file with the iOS\Cocoa Touch\Objective-C class
template. Name the class TickleGestureRecognizer, and make it a
subclass of UIGestureRecognizer.
Then replace TickleGestureRecognizer.h with the following:
#import <UIKit/UIKit.h>

typedef enum {
    DirectionUnknown = 0,
    DirectionLeft,
    DirectionRight
} Direction;

@interface TickleGestureRecognizer : UIGestureRecognizer

@property (assign) int tickleCount;
@property (assign) CGPoint curTickleStart;
@property (assign) Direction lastDirection;

@end
|
Here we are declaring three properties of info we need to keep track of to detect this gesture. We’re keeping track of:
- tickleCount: How many times the user has switched the
direction of their finger (while moving a minimum amount of points).
Once the user moves their finger direction 3 times, we count it as a
tickle gesture.
- curTickleStart: The point where the user started moving in
this tickle. We’ll update this each time the user switches direction
(while moving a minimum amount of points).
lastDirection: The last direction the finger was moving.
It will start out as unknown, and after the user moves a minimum
amount we’ll see whether they’ve gone left or right and update this
appropriately.
Of course, these properties here are specific to the gesture we’re
detecting here – you’ll have your own if you’re making a recognizer for a
different type of gesture, but you can get the general idea here.
Now switch to TickleGestureRecognizer.m and replace it with the following:
#import "TickleGestureRecognizer.h"
#import <UIKit/UIGestureRecognizerSubclass.h>

#define REQUIRED_TICKLES        2
#define MOVE_AMT_PER_TICKLE     25

@implementation TickleGestureRecognizer
@synthesize tickleCount;
@synthesize curTickleStart;
@synthesize lastDirection;

- (void)touchesBegan:(NSSet *)touches withEvent:(UIEvent *)event {
    UITouch * touch = [touches anyObject];
    self.curTickleStart = [touch locationInView:self.view];
}

- (void)touchesMoved:(NSSet *)touches withEvent:(UIEvent *)event {

    // Make sure we've moved a minimum amount since curTickleStart
    UITouch * touch = [touches anyObject];
    CGPoint ticklePoint = [touch locationInView:self.view];
    CGFloat moveAmt = ticklePoint.x - curTickleStart.x;
    Direction curDirection;
    if (moveAmt < 0) {
        curDirection = DirectionLeft;
    } else {
        curDirection = DirectionRight;
    }
    if (ABS(moveAmt) < MOVE_AMT_PER_TICKLE) return;

    // Make sure we've switched directions
    if (self.lastDirection == DirectionUnknown ||
        (self.lastDirection == DirectionLeft && curDirection == DirectionRight) ||
        (self.lastDirection == DirectionRight && curDirection == DirectionLeft)) {

        // w00t we've got a tickle!
        self.tickleCount++;
        self.curTickleStart = ticklePoint;
        self.lastDirection = curDirection;

        // Once we have the required number of tickles, switch the state to ended.
        // As a result of doing this, the callback will be called.
        if (self.state == UIGestureRecognizerStatePossible && self.tickleCount > REQUIRED_TICKLES) {
            [self setState:UIGestureRecognizerStateEnded];
        }
    }

}

- (void)reset {
    self.tickleCount = 0;
    self.curTickleStart = CGPointZero;
    self.lastDirection = DirectionUnknown;
    if (self.state == UIGestureRecognizerStatePossible) {
        [self setState:UIGestureRecognizerStateFailed];
    }
}

- (void)touchesEnded:(NSSet *)touches withEvent:(UIEvent *)event
{
    [self reset];
}

- (void)touchesCancelled:(NSSet *)touches withEvent:(UIEvent *)event
{
    [self reset];
}

@end
|
There’s a lot of code here, but I’m not going to go over the
specifics because frankly they’re not quite important. The important
part is the general idea of how it works: we’re implemeneting
touchesBegan, touchesMoved, touchesEnded, and touchesCancelled and
writing custom code to look at the touches and detect our gesture.
Once we’ve found the gesture, we want to send updates to the callback
method. You do this by switching the state of the gesture recognizer.
Usually once the gesture begins, you want to set the state to
UIGestureRecognizerStateBegin, send any updates with
UIGestureRecognizerStateChanged, and finalize it with
UIGestureRecognizerStateEnded.
But for this simple gesture recognizer, once the user has tickled the
object, that’s it – we just mark it as ended. The callback will get
called and we can implement the code there.
OK, now let’s use this new recognizer! Open ViewController.h and make the following changes:
// Add to top of file
#import "TickleGestureRecognizer.h"

// Add after @interface
@property (strong) AVAudioPlayer * hehePlayer;
- (void)handleTickle:(TickleGestureRecognizer *)recognizer;
|
And to ViewController.m:
// After @implementation
@synthesize hehePlayer;

// In viewDidLoad, right after TODO
TickleGestureRecognizer * recognizer2 = [[TickleGestureRecognizer alloc] initWithTarget:self action:@selector(handleTickle:)];
recognizer2.delegate = self;
[view addGestureRecognizer:recognizer2];

// At end of viewDidLoad
self.hehePlayer = [self loadWav:@"hehehe1"];

// Add at beginning of handlePan (gotta turn off pan to recognize tickles)
return;

// At end of file
- (void)handleTickle:(TickleGestureRecognizer *)recognizer {
    [self.hehePlayer play];
}
|
So you can see that using this custom gesture recognizer is as simple as using the built-in ones!
Compile and run and “he he, that tickles!”
Where To Go From Here?
Here is an
example project with all of the code from the above tutorial.
Congrats, you now have tons of experience with gesture recognizers! I hope you use them in your apps and enjoy!
If you have any comments or questions about this tutorial or gesture
recognizers in general, please join the forum discussion below!