The default implementation of the UISplitViewController based template in Xcode does not provide a navigation controller stack in the detail view. Instead it is just a regular old view with a navigation bar at the top. I suppose there are cases when you might want such an implementation, however, i think you would more commonly want there to be a navigation stack for cases when you wan to push new view controllers for your users to see. In this post i intend to demonstrate how to convert the default template to something more useable.
Double-click DetailView.xib under the Resources group in your newly created project. This will open Interface Builder.
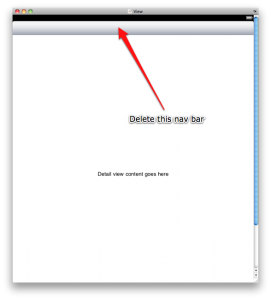
The first thing you will notice in the Interface Builder editor is that there is a UINavigationBar at the top. Select this bar and delete it. We will be switching the detail view of this split view project to use a UINavigationController which will add this nav bar back in for us but will provide the whole navigation stack along with it providing us the flexibility to push new view controllers in the detail view.
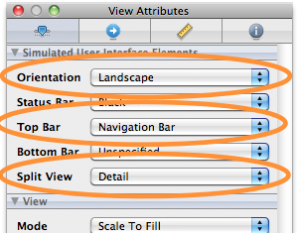
In the View inspector you will also want to make the Orientation Landscape, make the Top Bar a Navigation Bar, and set the Split View option to “Detail”.
Once you have made these changes, save the nib and switch back to Xcode. Now, double click the MainWindow.xib file in the Resources section of your Xcode project which will open it in Interface Builder.
Notice that the Split View Controller contains two view controllers. The first one is a navigation controller, but the second one is our detail view controller. The first thing you want to do is change that. From the Library palette in Interface Builder, select the Navigation Controller object and drag and drop it on top of the detail view controller in the resources window.
The detail view controller will automatically switch to a navigation controller. Now you need to twirl down the new nav controller and change the root view controller type to a DetailViewController by switching to the Identity tab in the inspector.
Finally we are going to need to make our new navigation controller a delegate of the UISplitViewController in order to receive split view change notifications. Drag a connection from the Split View Controller to the Detail View Controller and select delegate.
Save your work. If you switch back to Xcode and run the application, you may not notice much of a difference in the look of the application, however, we can now make some changes in code that will give us a lot more flexibility.
This code will allow you to see the word ‘Spiffy’ in the navigation bar.
Next, you will notice that in portrait view, we have no button to tap to see our table view. It is only available in landscape view. To remedy this, you need to change a few lines of code–again in the DetailViewController you will modify the split view delegate methods. These methods simple add and remove the bar button item depending upon which mode we’re in, landscape or portrait or more specifically whether we are showing or hiding our list view controller.
Now you can see our button show and hide correctly.
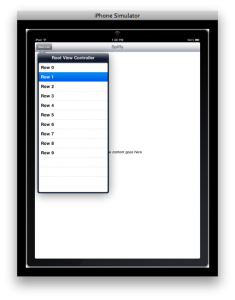
A problem you my run into now is that when you select one of the items in the list view, the detail view doesn’t actually update. This is due to the fact that we disconnected things when we changed our detail view controller in the split view to a navigation controller and we never re-connected it. To re-connect, open MainWindow.xib in Interface Builder again by double clicking it from the Resources group in Xcode. Then drag a connection from the root view controller to the Detail View Controller and select detailViewController.
In Xcode, create an action in the detail view controller that we will connect to. The code will look something like this.
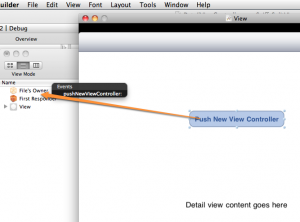
In Xcode, double click the DetailView.xib to open it in Interface Builder. Then add a button to the view. Drag a connection from the new button to the action we just created.
Save your changes and go back into Xcode. Select File | New File…. In the ensuing dialog, choose UIViewController subclass in the Cocoa Touch Class group and make sure you have Targeted for iPad and With XIB for user interface selected. Click Next and then provide a name. I called my NewViewController.
Double-click the NewViewController.xib file to open it in Interface Builder. Change the settings on the view to do the following:

Save your changes and switch back to Xcode. In the -viewDidLoad of your NewViewController.m file, set the title again.
Now, in your DetailViewController.m file, #import the NewViewController.h file and then implement the push new view controller action.
Now, when you tap the button on the detail view controller, a NewViewController will be pushed onto the navigation stack.
SpiffySplitView Xcode Project
Gut The Default Template
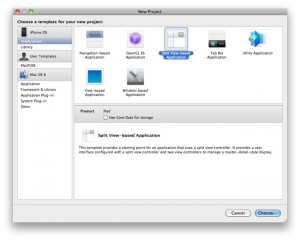
It’s not quite as drastic as the work ‘gut’ might imply, but you want to remove some things from the default template nib. To get started create a Split View project, by selecting File | New Project… in Xcode. Then choose Split View-based Application and click Choose…. Name your application. I called mine ‘SpiffySplitView’.
Double-click DetailView.xib under the Resources group in your newly created project. This will open Interface Builder.
The first thing you will notice in the Interface Builder editor is that there is a UINavigationBar at the top. Select this bar and delete it. We will be switching the detail view of this split view project to use a UINavigationController which will add this nav bar back in for us but will provide the whole navigation stack along with it providing us the flexibility to push new view controllers in the detail view.

In the View inspector you will also want to make the Orientation Landscape, make the Top Bar a Navigation Bar, and set the Split View option to “Detail”.

Once you have made these changes, save the nib and switch back to Xcode. Now, double click the MainWindow.xib file in the Resources section of your Xcode project which will open it in Interface Builder.
Implementing a Navigation Controller In The Detail View
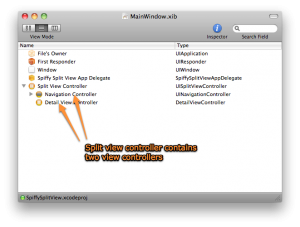
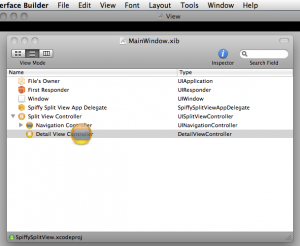
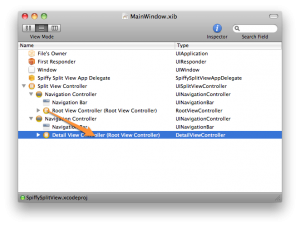
When MainWindow.xib opens in Interface Builder, take a look at the MainWindow.xib resources and switch to the detailed list view if you haven’t already so that the window looks something like this:
Notice that the Split View Controller contains two view controllers. The first one is a navigation controller, but the second one is our detail view controller. The first thing you want to do is change that. From the Library palette in Interface Builder, select the Navigation Controller object and drag and drop it on top of the detail view controller in the resources window.

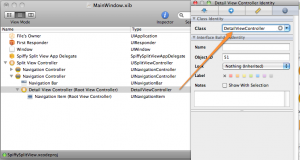
The detail view controller will automatically switch to a navigation controller. Now you need to twirl down the new nav controller and change the root view controller type to a DetailViewController by switching to the Identity tab in the inspector.

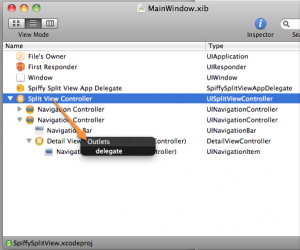
Finally we are going to need to make our new navigation controller a delegate of the UISplitViewController in order to receive split view change notifications. Drag a connection from the Split View Controller to the Detail View Controller and select delegate.

Save your work. If you switch back to Xcode and run the application, you may not notice much of a difference in the look of the application, however, we can now make some changes in code that will give us a lot more flexibility.
Changes In Code
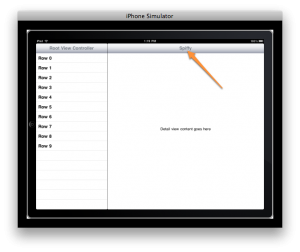
Edit DetailViewController.m in Xcode and change the -viewDidLoad method to set a title for the view controller. This will get passed up to the navigation controller which will display the title in the navigation bar.1 2 3 4 5 | - (void)viewDidLoad { [super viewDidLoad]; [self setTitle:@"Spiffy"]; } |

Next, you will notice that in portrait view, we have no button to tap to see our table view. It is only available in landscape view. To remedy this, you need to change a few lines of code–again in the DetailViewController you will modify the split view delegate methods. These methods simple add and remove the bar button item depending upon which mode we’re in, landscape or portrait or more specifically whether we are showing or hiding our list view controller.
1 2 3 4 5 6 7 8 9 10 11 12 13 14 15 16 17 18 | - (void)splitViewController:(UISplitViewController*)svc willHideViewController:(UIViewController *)aViewController withBarButtonItem:(UIBarButtonItem*)barButtonItem forPopoverController:(UIPopoverController*)pc { [barButtonItem setTitle:@"Root List"]; [[self navigationItem] setLeftBarButtonItem:barButtonItem]; [self setPopoverController:pc]; } - (void)splitViewController:(UISplitViewController*)svc willShowViewController:(UIViewController *)aViewController invalidatingBarButtonItem:(UIBarButtonItem *)barButtonItem { [[self navigationItem] setLeftBarButtonItem:nil]; [self setPopoverController:nil]; } |

A problem you my run into now is that when you select one of the items in the list view, the detail view doesn’t actually update. This is due to the fact that we disconnected things when we changed our detail view controller in the split view to a navigation controller and we never re-connected it. To re-connect, open MainWindow.xib in Interface Builder again by double clicking it from the Resources group in Xcode. Then drag a connection from the root view controller to the Detail View Controller and select detailViewController.

The Point
So now what? The project is, in essence, now back to where it was when we started, right? Except now we can push new view controllers onto the stack. To demonstrate this, let’s add a button to the detail view controller that will be the trigger for pushing a new view controller and then we can create the new view controller to push.In Xcode, create an action in the detail view controller that we will connect to. The code will look something like this.
1 2 3 4 5 | - (IBAction)pushNewViewController:(id)sender; { // Create and push new view controller here } |

Save your changes and go back into Xcode. Select File | New File…. In the ensuing dialog, choose UIViewController subclass in the Cocoa Touch Class group and make sure you have Targeted for iPad and With XIB for user interface selected. Click Next and then provide a name. I called my NewViewController.
Double-click the NewViewController.xib file to open it in Interface Builder. Change the settings on the view to do the following:
- Set orientation to landscape
- Set Top Bar to Navigation Bar
- Set Split View to Detail

Save your changes and switch back to Xcode. In the -viewDidLoad of your NewViewController.m file, set the title again.
1 2 3 4 5 | - (void)viewDidLoad { [super viewDidLoad]; [self setTitle:@"New View Controller"]; } |
1 2 3 4 5 6 7 | - (IBAction)pushNewViewController:(id)sender; { // Create and push new view controller here NewViewController *controller = [[NewViewController alloc] init]; [[self navigationController] pushViewController:controller animated:YES]; [controller release], controller = nil; } |
Conclusion
There are certainly legitimate reasons to place a navigation bar into your view manually. You might want to just use it as a place for tool bar items or other information. You may not need the navigation controller stack functionality, but providing yourself a way to push a new view controller on the navigation stack opens up additional possibilities while retaining the capabilities you have by using only a navigation bar. As the kids say, “it’s all good”. Until next time.SpiffySplitView Xcode Project
